
WebSockets are a powerful tool for building real-time applications, allowing for bi-directional communication between the client and server. Mastering WebSockets in iOS is the key to unlocking their potential for your applications.
This article will explore how to use WebSockets in iOS, specifically with the popular networking library, SocketIO. We will start by defining what WebSockets are and why they are important. Next we will explain how they establish a connection by illustrating a simple implementation example with an iOS chat client. Next, we will explore the advantages and disadvantages of using WebSockets. Finally, we will list the best practices to follow when implementing WebSockets.
Before delving into the implementation specifics for mastering WebSockets in iOS, let’s first comprehend the fundamentals of WebSockets and how they vary from conventional HTTP communication.
Understanding WebSockets
The HTTP request-response model has traditionally been the foundation for client-server communication. The server receives a request from the client and replies with a response. This has several restrictions but generally works well.
The first thing to note is that most HTTP requests are unidirectional, meaning that while the client can give the server a request, the server cannot push data to the client without the client first making a request. Applications that demand real-time updates, such as chat programs or multiplayer games, may have issues with this.
WebSockets were designed to address this limitation by providing a persistent, bi-directional connection between the client and server. Once a WebSocket connection has been made, neither side needs to wait for a request-response cycle before sending data to the other. This enables updates and real-time communication between the server and the client.
Setting Up a WebSocket Connection
To establish a WebSocket connection, the client sends a handshake request to the server, asking to upgrade the connection from HTTP to WebSockets. The server then responds with an HTTP 101 status code, indicating that the upgrade has been successful and is now a WebSocket connection.
After the connection is established, either party can send data to the other using the WebSocket protocol, which is based on a simple frame structure. Each frame contains a small amount of data and a few bytes of metadata, such as the frame type and the payload length.
Mastering WebSockets in iOS
Now that we have a basic understanding of WebSockets let’s look at how to use them in an iOS application so we can master WebSockets in iOS. For this, we will use the SocketIO library, which provides a convenient interface for working with WebSockets in iOS.
To get started, we first need to install the SocketIO library.
To install the library, all you have to do is click on File -> Add packages…, then add the following URL on the search bar on the top right, and finally, click on add package.
https://github.com/socketio/socket.io-client-swift

With the SocketIO library installed, we can now use WebSockets in our iOS application. Let’s first go through the fundamentals of a basic connection implementation.
Connecting to a WebSocket Server
To connect to a WebSocket server, we first need to create a SocketIOClient object and specify the server URL. We can then call the connect method to establish a connection:
let socket = SocketIOClient(socketURL: URL(string: "http://localhost:3000")!)

socket.connect()
Once we establish the connection, we can start sending and receiving data over the WebSocket connection.
Sending Data
To send data to the server, we can use the emit method of the SocketIOClient object. The emit method takes two arguments: the event name and the data that it will send. For example, to send a message to the server, we could do the following:
socket.emit("sendMessage", ["Hello, Server!"])We can also specify a callback function that will be called when the server responds to the event. The callback function takes an array of data as its argument:
socket.emit("sendMessage", ["Hello, Server!"]) { data, ack in
    // Handle server response
}
Receiving Data
To receive data from the server, we can use the on() method of the SocketIOClient object. The on() method takes two arguments: the event name and a callback function to be called when the event is received.
For example, to receive a message from the server, we could do the following:
socket.on("receiveMessage") { data, ack in
    if let message = data[0] as? String {
        print("Received message: \(message)")
    }
}
Disconnecting
To disconnect from the WebSocket server, we can use the disconnect method of the SocketIOClient object:
socket.disconnect()Now that we have understand the basics of a socketed connection implementation, let’s create a more functional and valuable implementation with a chat client complete with a server in NodeJS. I will develop this example in SwiftUI, so if you still need to gain a good mastery of this technology, you can find more information in these posts.
Building a Chat Client in iOS with WebSockets
First, let’s create the structure that will represent the message for the communication. You can create something as simple as the following.
struct Message: Hashable {
    var username: String
    var text: String
    var id: UUID
}
It contains a username to identify the messenger, the message text, and an ID to make every message unique.
Now, we need to create the chat client class that will handle all the necessary behaviors for a socketed connection with our server. This class will have a connect()/disconnect() method, a sendMessage() method, a receiveMessage() method, and a receiveNewUser() method to handle all the events that can occur in the app communication pipeline.
class ChatClient: NSObject {
    static let shared = ChatClient()

    var manager: SocketManager!
    var socket: SocketIOClient!
    var username: String!

    override init() {
        super.init()

        manager = SocketManager(socketURL: URL(string: "http://localhost:3000")!)
        socket = manager.defaultSocket
    }

    func connect(username: String) {
        self.username = username
        socket.connect(withPayload: ["username": username])
    }

    func disconnect() {
        socket.disconnect()
    }

    func sendMessage(_ message: String) {
        socket.emit("sendMessage", message)
    }

    func sendUsername(_ username: String) {
        socket.emit("sendUsername", username)
    }

    func receiveMessage(_ completion: @escaping (String, String, UUID) -> Void) {
        socket.on("receiveMessage") { data, _ in
            if let text = data[2] as? String,
               let id = data[0] as? String,
               let username = data[1] as? String {
                completion(username, text, UUID.init(uuidString: id) ?? UUID())
            }
        }
    }

    func receiveNewUser(_ completion: @escaping (String, [String:String]) -> Void) {
        socket.on("receiveNewUser") { data, _ in
            if let username = data[0] as? String,
               let users = data[1] as? [String:String] {
                completion(username, users)
            }
        }
    }
}
This class connects to a Socket.IO server running at http://localhost:3000. It then sends and receives messages using the sendMessage and receiveMessage methods of the ChatClient class.
Finally…
Finally, we need to create the chat view, so the app displays a messenger-like view for the user to interact and see other people’s messages. Here’s a simple implementation.
struct ChatView: View {
    @State private var message: String = ""
    @State private var messages: [Message] = []
    @State private var username: String = ""
    @State private var users: [String:String] = [:]
    @State private var newUser: String = ""
    @State private var showUsernamePrompt: Bool = true
    @State private var isShowingNewUserAlert = false

    var body: some View {
        NavigationView {
            VStack {
                if showUsernamePrompt {
                    HStack {
                        TextField("Enter your username", text: $username)
                            .textFieldStyle(RoundedBorderTextFieldStyle())

                        Button(action: connect) {
                            Text("Connect")
                        }
                    }
                    .padding()
                } else {
                    List {
                        ForEach(messages, id: \.self) { message in
                            HStack {
                                if message.username == username {
                                    Text("Me:")
                                        .font(.subheadline)
                                        .foregroundColor(.blue)
                                } else {
                                    Text("\(message.username):")
                                        .font(.subheadline)
                                        .foregroundColor(.green)
                                }

                                Text(message.text)
                            }
                        }
                    }

                    HStack {
                        TextField("Enter a message", text: $message)
                            .textFieldStyle(RoundedBorderTextFieldStyle())

                        Button(action: sendMessage) {
                            Text("Send")
                        }
                    }
                    .padding()
                }
            }
            .navigationBarTitle("Awesome Chat \(users.count > 0 ? "(\(users.count) connected)" : "")")
            .navigationBarTitleDisplayMode(.inline)
            .onDisappear {
                ChatClient.shared.disconnect()
            }
            .alert("\(newUser) just joined the chat!",
                   isPresented: $isShowingNewUserAlert) {
                Button("OK", role: .cancel) {
                    isShowingNewUserAlert = false
                }
            }
        }
    }

    func connect() {
        ChatClient.shared.connect(username: username)
        ChatClient.shared.receiveMessage { username, text, id in
            self.receiveMessage(username: username, text: text, id: id)
        }
        ChatClient.shared.receiveNewUser { username, users in
            self.receiveNewUser(username: username, users: users)
        }
        showUsernamePrompt = false
    }

    func sendMessage() {
        ChatClient.shared.sendMessage(message)
        message = ""
    }

    func receiveMessage(username: String, text: String, id: UUID) {
        messages.append(Message(username: username, text: text, id: id))
    }

    func receiveNewUser(username: String, users: [String:String]) {
        self.users = users
        self.newUser = username

        self.isShowingNewUserAlert = self.username != username
    }
}
And that’s it!
Or I would say that if you had a server actually listening on the other side for connections. Let’s address that.
Building a Server for Our Chat App
To create a new NodeJS project just create a directory and add a file named server.js on it. Next, open that file and add the following code.
const express = require('express');
const app = express();
const server = require('http').Server(app);
const io = require('socket.io')(server);
const { randomUUID } = require('crypto');

const users = new Map();

io.on('connection', (socket) => {
  let username = socket.handshake.auth.username;

  console.log('a user connected');

  users.set(socket.id, username);

  io.emit('receiveNewUser', username, Object.fromEntries(users));

  socket.on('sendMessage', (message) => {
    const username = users.get(socket.id);
    io.emit('receiveMessage', randomUUID(), username, message);
  });

  socket.on('disconnect', () => {
    console.log('user disconnected');
    users.delete(socket.id);
  });
});

server.listen(3000, () => {
  console.log('listening on *:3000');
});
Now, open a terminal window on the directory where the file is and run the following command.
npm install express socket.ioBy the way. If you don’t have npm installed on your computer, check out how to do so in this article.
This will create a new NodeJS project and load all the necessary dependencies.
Now, to start the server, all you have to do is run this command.
node server.jsThat is it. Your server is now running and listening to http://localhost:3000.
You can now run the app, and after you provide a name and click connect, you will get the following.
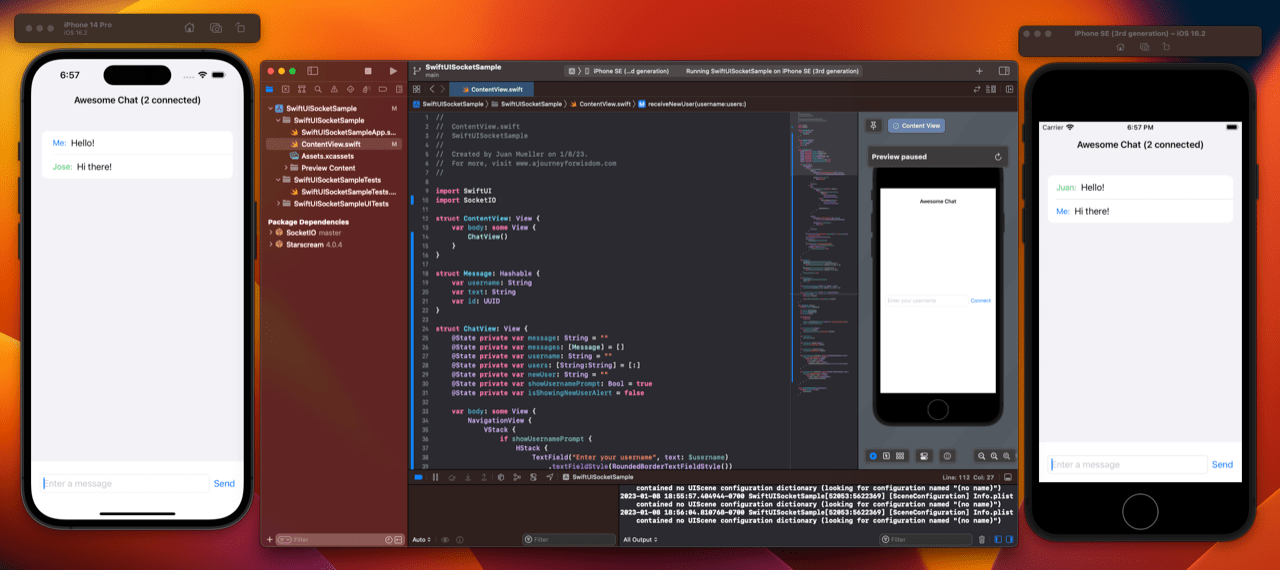
When the user enters a message and presses the “Send” button, the app sends the message and the username to the server. The server broadcasts the message and username to all connected clients, and the client displays the message in the chat history.
You can find the complete code in these repositories.
Advantages and Disadvantages of Using Sockets in iOS
As you probably know, not all technologies are perfect, and mastering WebSockets in iOS might not be enough. Here are some advantages and disadvantages of using sockets on your application.
Advantages
- Real-time communication: WebSockets allow for bi-directional communication between the client and server, enabling real-time updates and communication.
- Low latency: WebSockets have lower latency than traditional HTTP communication, as they do not require a request-response cycle for each message.
- Efficient use of resources: WebSockets use a single connection for all communication, whereas traditional HTTP communication requires a separate connection for each request. This can lead to more efficient use of resources, especially for applications with high traffic.
Disadvantages
- Complexity: WebSockets involve a more complex implementation compared to traditional HTTP communication.
- Limited browser support: WebSockets are not supported by all browsers, although most modern browsers support them.
- Security: WebSockets do not use the same security measures as HTTPS, so it is essential to implement additional security measures to protect against malicious attacks.
Best practices for using WebSockets in iOS
There are many ways to implement WebSockets in iOS, but that doesn’t mean that you should just venture into the unknown just for the sport. Here are some of the best practices when implementing WebSockets in iOS.
Use a library
Working with WebSockets can be complex, especially when handling the low-level details of the WebSocket protocol. A library like SocketIO can simplify the process and provide a convenient interface for working with WebSockets.
Secure the connection
WebSockets do not use the same security measures as HTTPS, so it is essential to implement additional security measures to protect against malicious attacks. Using a secure connection (wss://) and implementing authentication and authorization mechanisms are good ways to start.
Handle errors and disconnections
It is crucial to handle errors and disconnections gracefully, as they can occur for various reasons, such as network issues or server downtime. Implementing retry logic and providing feedback to the user in case of errors or disconnections is a good idea.
Optimize for performance
WebSockets can be used for high-traffic applications, so it is critical to optimize for performance. This could include minimizing the amount of data sent over the WebSocket connection, using efficient data structures, and minimizing the number of connections.
Test thoroughly
As with any application, it is vital to thoroughly test your WebSocket implementation to ensure that it is stable and performs well under different conditions. To mitigate this, testing with different network conditions, stress testing with high traffic, and simulating errors and disconnections can be a tremendous asset.
Conclusion
In conclusion, mastering WebSockets in iOS can be a potent skill for creating real-time iOS applications but also introduce complexity and security concerns. WebSockets may not be the best fit for your particular use case; thus, it is crucial to give it significant thought.
You can also read about the OAuth Token Refresh model’s role in enhancing platform and API security with Token Refresh in Authentication here.
This post was originally written for and published by Waldo.com
Leave a Reply