
Creating intuitive forms in iOS applications is crucial for user engagement and data collection, and with the advent of SwiftUI, developers have access to a robust framework that simplifies this task. Launched in September 2019, SwiftUI revolutionized the way we think about UI development on Apple platforms, offering a more interactive and intuitive approach to composing views. As mobile developers, it’s essential to stay ahead with the latest tools and design patterns, and SwiftUI’s form components are a testament to Apple’s commitment to providing state-of-the-art resources. This guide delves into the world of intuitive SwiftUI forms, ensuring that you’re equipped to build sleek, user-friendly forms for your iOS projects. Whether you’re a seasoned Swift coder or new to the platform, this article will serve as your comprehensive introduction to leveraging SwiftUI forms effectively.
If you haven’t had the opportunity to stretch your muscles with this new workflow or you are new to the platform, and you’re looking for a simple and straightforward introduction to SwiftUI, this is the article for you.
This article assumes that you have experience working with the Swift language and Xcode 12. If you have no background in these tools, please take some time to explore them first.
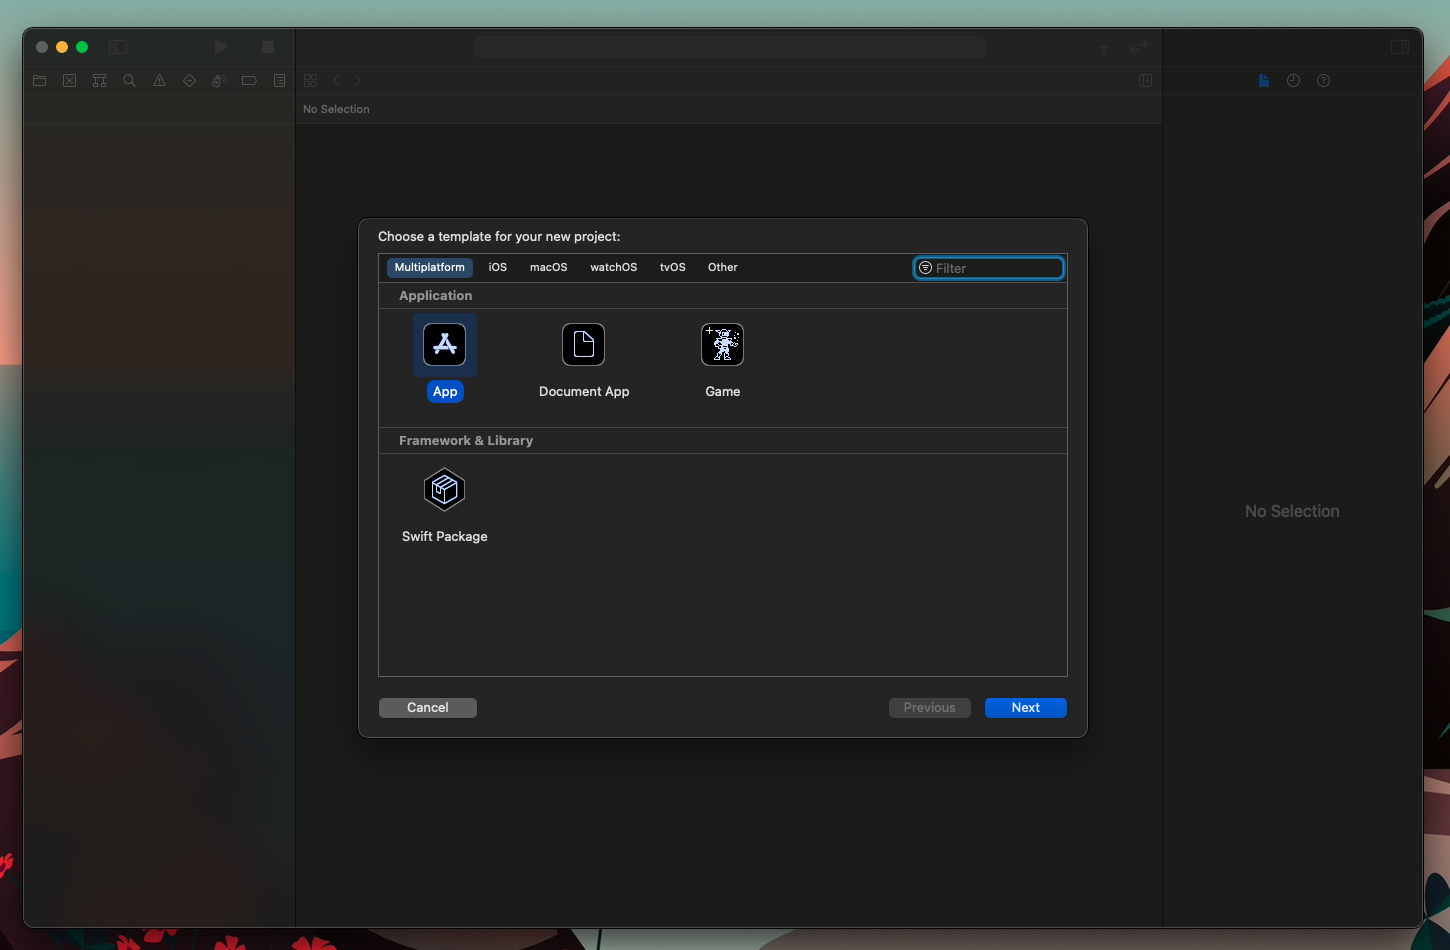
Create Your First Application
First things first, let’s create our app by opening Xcode and starting a new project. You can do this by clicking the Create a new Xcode project button.

After this, click on the App template in the Application section.
Note: From here, you could select to create a platform-specific app or a (universal) multiplatform app by clicking on the tabs in the top section. For this article, we will be working on a multiplatform app.
You will then be presented with the option to name our project. As you can see, I have proceeded to name the project “SwiftUISample,” but you can call it anything you like.
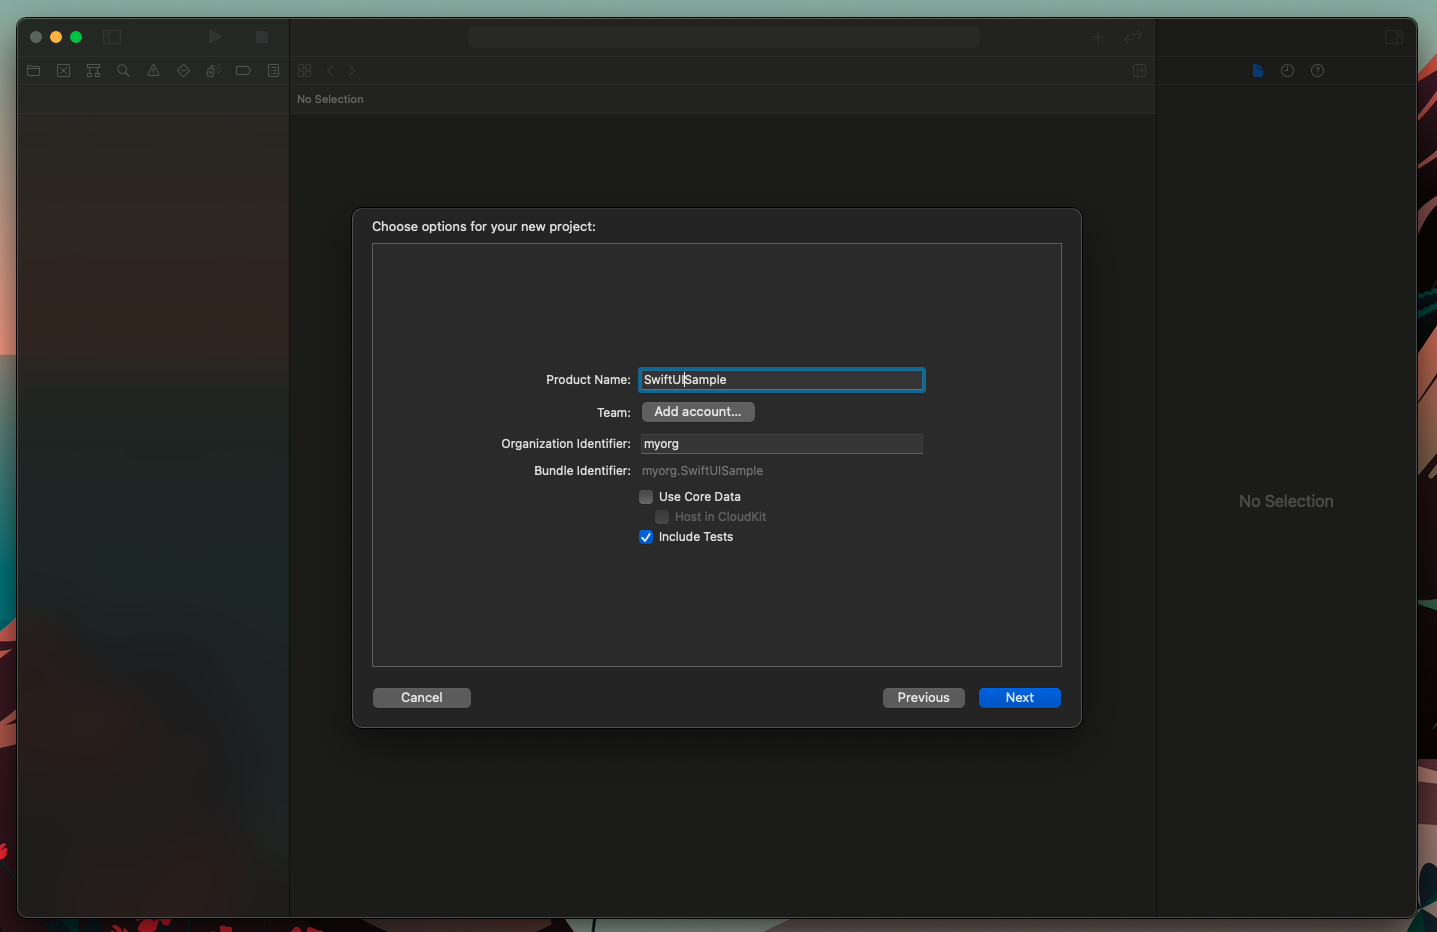
Note: You will also have to provide an organization identifier which will serve as the unique identifier linking applications you produce to you. This aspect is not relevant to this article, so you can name it anything you like.
Make sure to have the “include Tests” option selected so that Xcode bundles the basic test skeletons on your project.
Once all this is done, and you have told Xcode where to store your project, Xcode will present you with something very similar to the following.

Note: Don’t worry if you can’t see the device preview right away. Just click on the Resume button on the top right, and it will display the “Hello World!” text correctly.
Et voila! You have created a SwiftUI powered universal app.
Moving forward, I will assume that you have taken some time to familiarize yourself with the IDE and the structure of Swift projects.
Understanding the SwiftUI workflow
Although a lot has changed in the workflow required to develop SwiftUI projects, Xcode still feels very familiar. If you haven’t had the opportunity to work on a SwiftUI project before, I would highly recommend that you go here and get yourself acquainted with it. A deep dive into the workflow is outside the scope of this article.
Nevertheless, I will give you a very brief summary of what you have in front of you right now.
As you can see, your project currently has two files in it. A ContentView.swift file and an <APP_NAME>App.swift file, where APP_NAME is the name you used for the project.
The latter is the root application class; Don’t worry about it for now. The former, however, is where we will be working.
All SwiftUI View classes have the same structure, a View struct that defines the view structure and functionality and a Preview View struct that serves as a helper for the emulator to display your work in real-time.
As you can see, in the ContentView struct there is a body variable of type View that defines the body of that view. Therefore, any modification that you want to make to your view must be done in this variable.
Currently, that view contains a Text view object containing the titular “Hello World!” statement.
We can now start working on our view.
SwiftUI Forms
Now that you have successfully created an app and have a good grasp of the SwiftUI workflow, we can add a simple form to allow the user to input information.
Doing so is extremely easy. For example, you can embed the Text object in a Form like so.
import SwiftUI

struct ContentView: View {
    var body: some View {
        Form(content: {
            Text("Hello World!")
        })
    }
}
As you can see, if you have the preview running, you can immediately see the results of your code —pretty neat.
Now, this doesn’t look like a proper form as we know and love it, right? So, let’s add a modifier to the Form to add a heading text.
import SwiftUI

struct ContentView: View {
    var body: some View {
        Form(content: {
            Text("Hello World!")
        })
        .navigationBarTitle("User Form")
    }
}
Wait. Why doesn’t it show up?
Well, you need to have a NavigationView element for the Form to put the title on.
Following the same steps we used to embed our Text into a Form, we can embed our Form into a NavigationView.
import SwiftUI

struct ContentView: View {
    var body: some View {
        NavigationView {
            Form(content: {
                Text("Hello World!")
            })
            .navigationBarTitle("User Form")
        }
    }
}
Nice! Looking good!
Next, we will be adding some fields to the form so the user can input data into it. But first, let’s quickly go through them.
The Common Form Elements of SwiftUI
If you have some experience working with Swift or even Obj-c, you can expect to find all the elements you are familiar with in SwiftUI. Labels, Toggles, Button, Picker, you name it.
Here is a list of the most common elements and a sample constructor for each of them.
- Text: Mostly used for displaying mutable information in the view.
Text("This is a text!")- TextField: Basic input field for forms and other views.
TextField("Username", text: $name)- Label: Mostly used for displaying text information in the view.
Label("Lightning", systemImage: "bolt.fill")- Button: Action input for forms and other views.
Button(action: signIn) { Text("Sign In") }- Toggle: Action input for binary data.
Toggle("Public", isOn: $isPublic)- Picker: Select input for collection of options.
Picker("Color", selection: $selectedColor) {
    Text("Red")
    …
}
Adding Functionality to Our Form in SwiftUI
Now that we are more familiar with the elements that can exist in a form let’s add some.
First, let’s add a TextField element so the user can input some credentials.
import SwiftUI

struct ContentView: View {
    @State var name: String = ""

    var body: some View {
        NavigationView {
            Form(content: {
                // Text field
                TextField("Username", text: $name)
            })
            .navigationBarTitle("User Form")
        }
    }
}
Wait. What is that variable prefixed by @State?
As the prefix indicates, it is a ‘state’ variable that holds the value inputted by the user and is accessible in between views through the lifespan of the operation. These variables are required for all elements of the form.
We can also add a secure TextField for fields that should not display their inputted value, like password fields.
import SwiftUI

struct ContentView: View {
    @State var name: String = ""
    @State var password: String = ""

    var body: some View {
        NavigationView {
            Form(content: {
                // Text field
                TextField("Username", text: $name)
                // Secure field
                SecureField("Password", text: $password)
            })
            .navigationBarTitle("User Form")
        }
    }
}
Next, let’s add gender, birth date, and language fields.
import SwiftUI

struct ContentView: View {
    enum Gender: String, CaseIterable, Identifiable {
        case male
        case female
        case other

        var id: String { self.rawValue }
    }

    enum Language: String, CaseIterable, Identifiable {
        case english
        case french
        case spanish
        case japanese
        case other

        var id: String { self.rawValue }
    }

    @State var name: String = ""
    @State var password: String = ""
    @State var gender: Gender = .male
    @State var language: Language = .english
    @State private var birthdate = Date()

    var body: some View {
        NavigationView {
            Form(content: {
                // Text field
                TextField("Username", text: $name)
                // Secure field
                SecureField("Password", text: $password)
                // Segment Picker
                Picker("Gender", selection: $gender) {
                    ForEach(Gender.allCases) { gender in
                        Text(gender.rawValue.capitalized).tag(gender)
                    }
                }
                .pickerStyle(SegmentedPickerStyle())
                // Date picker
                DatePicker("Date of birth",
                           selection: $birthdate,
                           displayedComponents: [.date])
                // Scroll picker
                Picker("Language", selection: $language) {
                    ForEach(Language.allCases) { language in
                        Text(language.rawValue.capitalized).tag(language)
                    }
                }
            })
            .navigationBarTitle("User Form")
        }
    }
}
Alright, there is some stuff to unpack from there.
Firstly, the Picker requires an array of elements to display as options, which has been done with the enum struct.
Secondly, the options are being processed with a ForEach which in SwiftUI is a clause to process and return a list of views to a parent.
Finally, let’s add a button for submitting the form —a piece of cake.
import SwiftUI

struct ContentView: View {
    enum Gender: String, CaseIterable, Identifiable {
        case male
        case female
        case other

        var id: String { self.rawValue }
    }

    enum Language: String, CaseIterable, Identifiable {
        case english
        case french
        case spanish
        case japanese
        case other

        var id: String { self.rawValue }
    }

    @State var name: String = ""
    @State var password: String = ""
    @State var gender: Gender = .male
    @State var language: Language = .english
    @State private var birthdate = Date()

    var body: some View {
        NavigationView {
            Form(content: {
                // Text field
                TextField("Username", text: $name)
                // Secure field
                SecureField("Password", text: $password)
                // Segment Picker
                Picker("Gender", selection: $gender) {
                    ForEach(Gender.allCases) { gender in
                        Text(gender.rawValue.capitalized).tag(gender)
                    }
                }
                .pickerStyle(SegmentedPickerStyle())
                // Date picker
                DatePicker("Date of birth",
                           selection: $birthdate,
                           displayedComponents: [.date])
                // Scroll picker
                Picker("Language", selection: $language) {
                    ForEach(Language.allCases) { language in
                        Text(language.rawValue.capitalized).tag(language)
                    }
                }
                // Button
                Button("Save") {
                    // DO SOMETHING
                }
            })
            .navigationBarTitle("User Form")
        }
    }
}
Alright. Looking good!
Or so I would like to say. It doesn’t really look very clean, does it?
Well, let’s now work on some styling.
Customizing Our Form Appearance in SwiftUI
The first thing we can do to improve our form appearance is to group elements that belong together.
We can do that with the Section clause.
import SwiftUI

struct ContentView: View {
    enum Gender: String, CaseIterable, Identifiable {
        case male
        case female
        case other

        var id: String { self.rawValue }
    }

    enum Language: String, CaseIterable, Identifiable {
        case english
        case french
        case spanish
        case japanese
        case other

        var id: String { self.rawValue }
    }

    @State var name: String = ""
    @State var password: String = ""
    @State var gender: Gender = .male
    @State var language: Language = .english
    @State private var birthdate = Date()

    var body: some View {
        NavigationView {
            Form(content: {
                Section(header: Text("Credentials")) {
                    // Text field
                    TextField("Username", text: $name)
                    // Secure field
                    SecureField("Password", text: $password)
                }

                Section(header: Text("User Info")) {
                    // Segment Picker
                    Picker("Gender", selection: $gender) {
                        ForEach(Gender.allCases) { gender in
                            Text(gender.rawValue.capitalized).tag(gender)
                        }
                    }
                    .pickerStyle(SegmentedPickerStyle())
                    // Date picker
                    DatePicker("Date of birth",
                               selection: $birthdate,
                               displayedComponents: [.date])
                    // Scroll picker
                    Picker("Language", selection: $language) {
                        ForEach(Language.allCases) { language in
                            Text(language.rawValue.capitalized).tag(language)
                        }
                    }
                }

                Section {
                    // Button
                    Button("Save") {
                        // DO SOMETHING
                    }
                }
            })
            .navigationBarTitle("User Form")
        }
    }
}
That gives us.
That already looks better, doesn’t it?
Now, let’s add some final touches to make the form look a bit more professional and make the button look better.
import SwiftUI
struct ContentView: View {
enum Gender: String, CaseIterable, Identifiable {
case male
case female
case other
var id: String { self.rawValue }
}
enum Language: String, CaseIterable, Identifiable {
case english
case french
case spanish
case japanese
case other
var id: String { self.rawValue }
}
@State var name: String = ""
@State var password: String = ""
@State var gender: Gender = .male
@State var language: Language = .english
@State private var birthdate = Date()
@State var isPublic: Bool = true
@State private var showingAlert = false
var body: some View {
NavigationView {
Form(content: {
Section(header: Text("Credentials")) {
// Text field
TextField("Username", text: $name)
// Secure field
SecureField("Password", text: $password)
}
Section(header: Text("User Info")) {
// Segment Picker
Picker("Gender", selection: $gender) {
ForEach(Gender.allCases) { gender in
Text(gender.rawValue.capitalized).tag(gender)
}
}
.pickerStyle(SegmentedPickerStyle())
// Date picker
DatePicker("Date of birth",
selection: $birthdate,
displayedComponents: [.date])
// Scroll picker
Picker("Language", selection: $language) {
ForEach(Language.allCases) { language in
Text(language.rawValue.capitalized).tag(language)
}
}
}
Section {
// Toggle
Toggle(isOn: $isPublic, label: {
HStack {
Text("Agree to our")
// Link
Link("terms of Service", destination: URL(string: "https://www.example.com/TOS.html")!)
}
})
// Button
Button(action: {
showingAlert = true
}) {
HStack {
Spacer()
Text("Save")
Spacer()
}
}
.foregroundColor(.white)
.padding(10)
.background(Color.accentColor)
.cornerRadius(8)
.alert(isPresented: $showingAlert) {
Alert(title: Text("Form submitted"),
message: Text("Thanks \(name)\n We will be in contact soon!"),
dismissButton: .default(Text("OK")))
}
}
})
.navigationBarTitle("User Form")
}
}
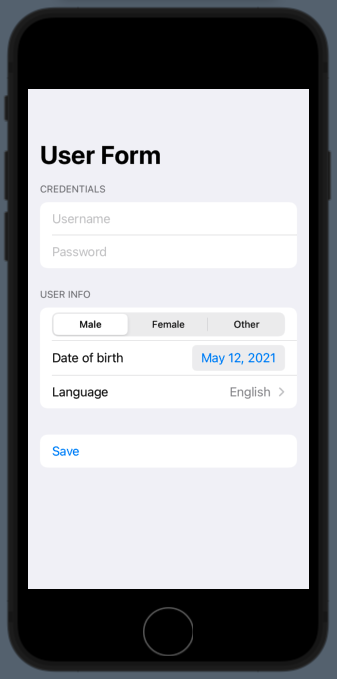
}Now we have.

Excellent work. Steve Jobs would be proud.
Testing Your Work
Alrighty, now that you have a good-looking form in your hands, you should probably test it. To do that, we will be working with Xcode’s UI testing framework, which is already bundled in the project.
If you open the Test iOS group in the left bar, you will see a Test_iOS.swift class file. In it, you can see that you have pretty much everything you need set up for you. Therefore, you can proceed and run it if you want to see the app running in the emulator.
To test that the code is working as intended, let’s add the following code to the testExample() function.
func testExample() throws {
    // UI tests must launch the application that they test.
    let app = XCUIApplication()

    app.launch()
    app.textFields["Username"].tap()
    app.textFields["Username"].typeText("test")
    app.textFields["Username"].typeText("\n")
    app.buttons["Save"].tap()

    XCTAssertTrue(app.alerts["Form submitted"].waitForExistence(timeout: 1))
    XCTAssert(app.alerts["Form submitted"].staticTexts["Thanks test\n We will be in contact soon!"].exists)

    // Use recording to get started writing UI tests.
    // Use XCTAssert and related functions to verify your tests produce the correct results.
}
Now run that test and check that the username field is populated with the text ‘test’ and the save button is pressed, presenting the alert with the message.
Nice!
Find more info on how to implement testing in Xcode UI here.
Bringing Elegance to the Market
Creating forms in applications is as old as the concept of a computer itself. Nevertheless, it has never been easier to create elegant and intuitive forms than now.
With tools like SwiftUI and Xcode in our belts, we can continue creating more creative and feature-rich applications that can excel in the market.
This post was originally written for and published by Waldo.com
Cover photo by Roman Synkevych on Unsplash
Leave a Reply