
Unlocking the Power of Bindings in SwiftUI is pivotal for every developer aiming to master this framework. In this guide, we’ll delve deep into SwiftUI Bindings, shedding light on their various facets and how they influence SwiftUI View workflows. By the end of this article, not only will you be well-acquainted with the essential binding techniques, but you’ll also have a hands-on project exemplifying all the critical concepts of SwiftUI bindings. For those familiar with Swift and Xcode 12, this exploration will enhance your existing knowledge. If you’re new to these tools, I recommend starting here to build a solid foundation.
Knowing the SwiftUI Workflow
Much has changed in the workflow required to develop SwiftUI projects. Yet Xcode probably still feels familiar to you. If that’s not the case for you or you haven’t worked on a SwiftUI project before, I highly recommend revisiting it first.
Nevertheless, here’s a brief summary of what you’ll see when creating your first project.
The default template project contains two files: a ContentView.swift file and an App.swift file. (APP_NAME will be the name you used for the project.)
SwiftUI View classes all possess the same structure: a View struct that defines the view structure and functionality and a PreviewView struct that serves as a helper for the emulator to display your work in real time.
In the ContentView struct, a body variable of type View defines the body of that View. So any modification that you want to make to your View must be done in this variable.
Presently, that View contains a TextView object containing the titular “Hello World!” statement.
SwiftUI Bindings
First off, let’s explain what a SwiftUI Binding is.
In essence, a binding, as the name implies, is a property directive (or wrapper) that indicates a relationship between an object or value and the View that consumes it. As the Apple documentation states, “A binding connects a property to a source of truth stored elsewhere, instead of storing data directly.”
The property assigned the @Binding directive will serve as a proxy of sorts for the View that needs access to the “source of truth,” which, in most cases, is a property in the parent. That property would be assigned a @State directive indicating that the value it holds is linked to the View’s state.
If you have worked with any Reactive programming language or technology, this must sound very familiar to you.
The purpose of this is to link interactive elements between a view hierarchy and persist states to enable functionality. Think of it as the Storyboard connections you had to do manually, but now it actually makes sense.
Now that we have a better understanding of what bindings are, let’s see them in action.
Implementing Proper Binding With SwiftUI
Starting from the basic “Hello World!” template project, let’s add a property that will hold how many times a button has been tapped.
Start by adding a @State variable in the ContentView class called tapCount of type Int. Don’t forget to initialize it.
import SwiftUI

struct ContentView: View {
    @State var tapCount : Int = 0

    var body: some View {
        Text("Hello World!")
    }
}
Next, create a new View class and call it PanelView.swift or anything you like.
As you did in the previous class, add a variable called tapCount, but in this case, instead of declaring it as @State, use the @Binding wrapper.
import SwiftUI

struct PanelView: View {
    @Binding var tapCount : Int

    var body: some View {
        Text("Hello World!")
    }
}
Let’s now proceed to add a button to this view that we can interact with. You can add an increment to the binding variable right then and there.
import SwiftUI

struct PanelView: View {
    @Binding var tapCount : Int

    var body: some View {
        Button("tap me!") {
            tapCount += 1
        }
    }
}
Great! Except that there seems to be an error, and we’re not getting anything from the previewer. What gives?
Well, whenever we add a @Binding variable, or any variable in a view that is not intrinsically initialized, it’s understood that our variable will be connected to another higher in the hierarchy. However, the previewer doesn’t know what value to use. This behavior is because it works with the class in isolation from the rest of the code. Therefore, we need to give it some value.
To do this is simple. Just pass a parameter to the “_Previews” class with a static value like so.
struct PanelView_Previews: PreviewProvider {
    static var previews: some View {
        PanelView(tapCount: .constant(0))
    }
}
And we’re in business!
Now that we can see what we’re working with, let’s give the button some style.
import SwiftUI

struct PanelView: View {
    @Binding var tapCount : Int

    var body: some View {
        Button("tap me!") {
            tapCount += 1
        }
        .foregroundColor(.white)
        .padding()
        .background(Color.green)
        .cornerRadius(8)
    }
}
Giving us this:
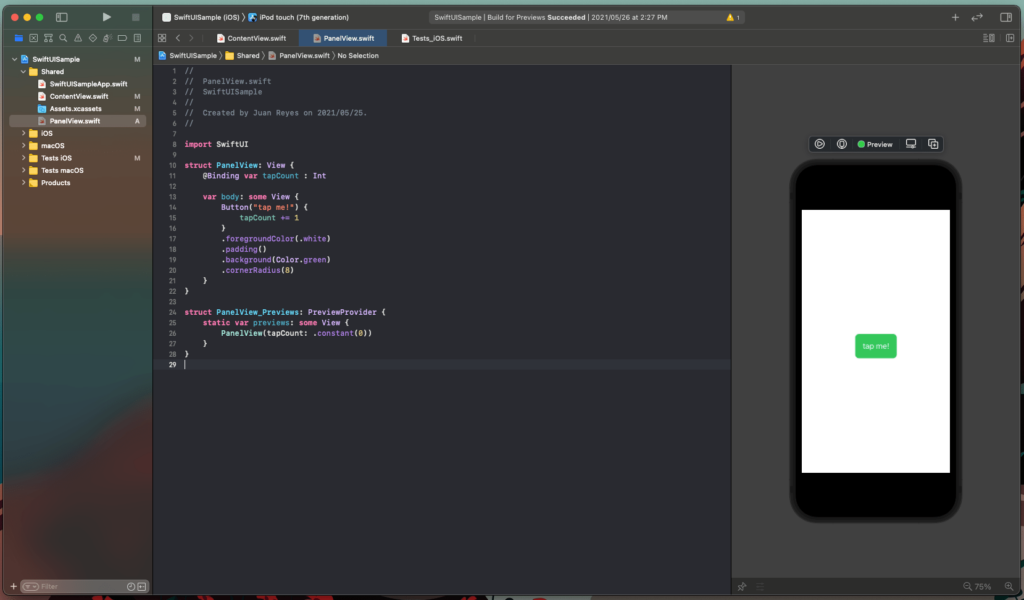
As you can see, the button is more inviting and easier to interact with.
If you want to go more in depth about working with buttons in SwiftUI, you can learn more here.
Adding Interaction
Going back to the ContentView, you can now add the view you created and see it show up. Remember that you need to inform this child view about the tapCount, but you can’t pass the variable as is since the View is expecting a binding. To pass the binding of a variable, just prefix the variable with the $ character. This indicates to the compiler that a binding to this variable is being linked to the child view.
import SwiftUI

struct ContentView: View {
    @State var tapCount : Int = 0

    var body: some View {
        PanelView(tapCount: $tapCount)
    }
}
Finally, let’s add some text to indicate the value of the tapCount variable.
import SwiftUI

struct ContentView: View {
    @State var tapCount : Int = 0

    var body: some View {
        VStack {
            Text("Tap this button and see what happens!")
            PanelView(tapCount: $tapCount)
            Text("You have tapped \(tapCount) times!")
        }
    }
}
NOTE: If you’re unfamiliar with stacks or want to learn how to create a more detailed view for the user, check out my previous post here.
You’ll now have something very similar to the following.
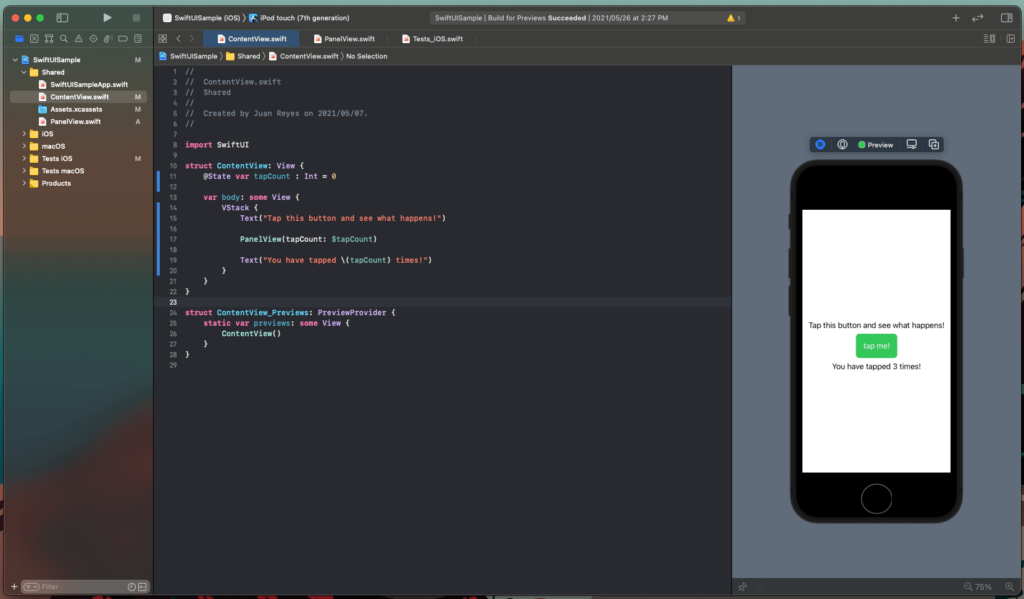
Go ahead and press the button. You’ll see that the child view is correctly referencing and updating the parent tapCount.
Power of Bindings in SwiftUI
All that is great and all, but what if we want to use bindings to handle the value for form elements?
To do this, you simply declare the @State variables and pass the binding as indicated above with the $ character preceding the variable name.
If you want, for example, to hold the value imputed from a TextView, just pass the binding like this:
TextField("Title", text: $title)
In this case, the $title is a @State variable in that view.
Testing Testing Testing
No good engineering work is done without proper testing to ensure the quality and functionality of our code. For this example, we’ll be keeping it simple and straightforward.
Go to the Test_iOS.swift class in the Test group and add the following code to the testExample method:
func testExample() throws {
    // UI tests must launch the application that they test.
    let app = XCUIApplication()
    app.launch()

    var tapCount = 0

    XCTAssert(app.staticTexts["You have tapped \(tapCount) times!"].isHittable)

    app.buttons["tap me!"].tap()
    tapCount += 1
    app.buttons["tap me!"].tap()
    tapCount += 1
    app.buttons["tap me!"].tap()
    tapCount += 1

    XCTAssert(app.staticTexts["You have tapped \(tapCount) times!"].isHittable)

    // Use recording to get started writing UI tests.
    // Use XCTAssert and related functions to verify your tests produce the correct results.
}
Run the code and notice that the button is pressed three times. Additionally, the text reflects the number of taps correctly, passing the test.
With testing, quality over quantity is the key to success. However, if you want to have a more complete and comprehensive testing workflow, I recomend checking out some robust solutions in the market.
Ever Relevant
Ever since the introduction of Swift in 2014 and SwiftUI in 2019, the folks at Cupertino have been steadily pushing for a complete reform in the development workflow for the Apple ecosystem. Parting ways with Objective-C and drastically changing the way UI is developed in Xcode, Apple has kept us, developers, on our toes to stay relevant.
SwiftUI Bindings is one of those changes that, if you have been working with Storyboards or are more used to developing your views manually, you might have found foreign and new. Nevertheless, now you have some experience working with it. And with that experience, you can take advantage of the platform’s momentum and move beyond.
This post was originally written for and published by Waldo.com
Cover photo by Brett Jordan on Unsplash
Leave a Reply